As a site administrator, you can offer a contact form for each Space. The contact form is one of Spaces Engine’s ‘Smart Widgets’, which means it will adapt to the Space it is on. Like all Space Widgets, it should only be used on one of your Space’s sidebars.
Setup for Site Administrators
Before you add a contact form, you will need to install and activate Contact Form 7. With over 5+ million active installs, Contact Form 7 is a well established and easy to use form plugin and a perfect match for the Contact Form Smart Widget. Once activated, you will see a sample form already set up.
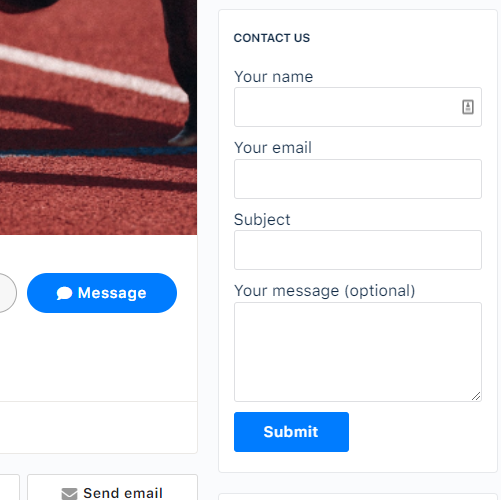
This simple form features boxes for a user to enter a name, email address, subject and message. This should be sufficient for most cases. however, there is one small piece of configuring we now need to do. Unlike any other form plugins you may have installed, we need to ensure that completed forms do not get received by you. Otherwise, you will be bombarded with emails meant for your Space owners!
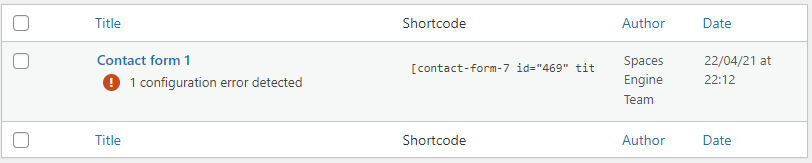
Hover over the name of your form, and click Edit. Next, in the Mail tab, empty the first box, labelled To. You will see a configuration error message – this means you are setup correctly, and you will not receive hundreds of emails. Save your form.
Lastly, make a note of the contact form ID. In the image above, you can see it inside the shortcode (469).
Now, go ahead and add the (SE) Contact Form widget to your Spaces Main Sidebar. Do this the same as you would for any other widget. Give your widget a title, or leave it as the default. Also, add the contact form ID from the last step into the second box.
That’s it. You’ve set up the contact form. Go into one of your test Spaces to see it – but before you do, you’ll need to follow the next half of this tutorial.
Setup for Space Owners
Even though you have enabled and configured a contact form, Space owners can choose not to display it. Why? Because they may not have the time or resources to manage email contact yet. So let’s assume you are happy to display a contact form on your Space.
Head into your Space Settings page, and then Contact Form. You will see two items. The first, enables the form on that Space. Turn it on.
The second is the email address the completed forms will be sent to. This is kept deliberately separate from your public email under About. This allows Spaces to have a specific email that feeds into their helpdesk software, or simply for better email routing. You can add multiple email addresses here, separated by a comma. Go ahead and put an email address in the box. Save your settings.
Let’s reload the page, and see your form. If all goes well, you should see it in the sidebar. Congratulations!
Making It Even Better
Generally, contact forms aren’t designed for sidebars. Let’s see if we can improve the form so it fits better in such a small space.
Head back to your contact form (Form tab) in the backend. You will see the template used to display it. Let’s tweak it so it doesn’t show labels (the text above the boxes) and instead, let’s add in some placeholders (the label text, but now inside the boxes). Simply replace the template with the following:
[text your-name placeholder "Enter name"]
[email your-email placeholder "Your email"]
[text your-subject placeholder "Your subject"]
[textarea your-message placeholder "Your message (optional)"]
[submit "Submit"]
It’s the same parts, just laid out in a more compact way. Go ahead and save your form.
Contact Form 7 is a very customizable form builder. With some basic CSS and and an understanding of the various fields and parameters it provides, you can configure your Space Contact Form any way you want.


