
Spaces offer an all-in-directory solution for the BuddyBoss community. Space owners can enjoy exclusive features like Custom Tab, Job Offers, and other valuable options to deliver a fully feature-rich Space experience to visitors.
However, besides having a complete directory solution, you may also need to add additional custom information about your Space. This is where our Space team introduces Custom Fields!
Those who have used the custom fields before are already aware of its privilege. And if it is new for you with Spaces, we will help you throughout this guide. Follow our all-inclusive guide to know everything about custom fields with Spaces.
WordPress Custom Fields with Spaces:
WordPress Custom Fields allows you to add values other than the default elements of a page. Custom fields are meant to help you provide additional important information about your business and add them to the relevant page.
If you have used any plugin in the past that has Custom Fields integrated or installed any plugin dedicated to Custom Fields like “Advanced Custom Fields,” you already have this option available on your WordPress dashboard. However, if it’s new to you, we are here to provide all the detailed information on using Custom Fields with Spaces.
Before we start our process, let’s take a look at how Custom Fields help to improve your audience experience:
- Add Anything: Custom fields add additional information to your website. This information is mainly referred to as ‘Metadata.’ This can include anything from HTML data to Texts, URLs, Selection, etc.
- Conditional Functions: While using custom fields to integrate with any plugin, you can use some functions conditionally. For example, when this – then that, or conditions like this. This leaves a wide variety of options to choose from and assign the function.
- Modify Data as You Like: To add customized data is one of the main reasons why custom fields are important for you. For example, you have a Space that promotes your food store and intend to attach cuisine style to your Space. You can add this information using Custom Fields.
- Enhance Page Functionality: Using custom fields, you can expand available data and give your visitors an extended journey on your website. This helps your company profile hold a stronger ground and represent a unique brand value.
- Easy but Not Without Help: You can add custom fields with/ without plugins in WordPress. Using them without plugins may get harder for you. Plugins like ACF make the process easier for any user of any level. Besides, you will often have tutorials and guides to associate with you throughout the process.
How to Use Custom Fields with Spaces:
There is an official doc on how you can use custom fields with Spaces. We will develop this tutorial from scratch so that beginners can get their hands on using custom fields with Spaces easily!
To enjoy the privilege of Custom Fields, make sure you have installed the latest version of Spaces Engine. Now follow these footsteps with us to insert custom data on your Space.
Step 1: Install Spaces Engine
To use Custom Fields with Spaces, you only need one plugin – Spaces Engine. There is no need for any integration plugins and it’s as easy as that.
Follow our official doc here to purchase and install Spaces Engine to your WP dashboard:
Step 2: Getting Used to Custom Fields (Author’s End)
Once you have installed and activated Spaces Engine following our official Docs, you will notice an additional option for Custom Fields in the WP dashboard.
If you have previously installed ACF or used any plugin that uses integrated Custom Fields, you must already know how to use them.
In this guide, we will insert additional Space Information for the fashion and clothing brand “Boho.” Follow these few steps with us and create your custom fields.
1. Go to Custom Fields> Add New. Here, we will add a new field group to insert custom data. The field group is powerful and allows you to collect all the custom fields together. You can also check on available field groups by selecting Custom Fields> Field Groups from the same menu.

2. Here, you will have to Add title for the new field group. We will have Boho features as our field group title.

3. Now, go to Location. This feature allows you to insert the field groups anywhere on the edit screen by setting a set of rules/ conditions. We already know, Custom Fields offer conditional values to insert custom data anywhere on your site.
So, we will use the Location to show the custom fields “if our Post Type is equal to Space.” We are choosing post type because we will show this custom data under additional information.

4. Now, scroll up and select, “+ Add Field.” This is where we will add the custom fields for our fashion and clothing brand “Boho.” We will add three additional fields as In-House Cafe Type, Variety of Fashion, and Parking Lot.

Here, the options are as followed:
- Field Label: Set a Label for your field. This will appear on the edit screen. So choose it wisely.
- Field Name: Field name is taken automatically. When you move the cursor from Field Label, this option will be automatically filled up with no spaces but underscore and dashes.
- Field Type: Select the field type you want for this custom field. We will select the Checkbox to select the cafe options for the author.
- Instructions: Set a group of information for the Author. This will be visible to the field authors when Space owners submit the fields.
- Required?: This option indicates which fields are mandatory to respond to.
- Use this field to filter Spaces?: When you select this option, this field will appear in the filter option for the Spaces and you can use it to filter out the Spaces with the same characteristics.
- Display on Space about page?: Do you want to display this field on Space About Page? If yes, toggle this option to yes.
- Choices: Choices appear when you select the Field Type to Choice. Make a list of choices and they will appear in the Space Owners section at the time of settling the fields.
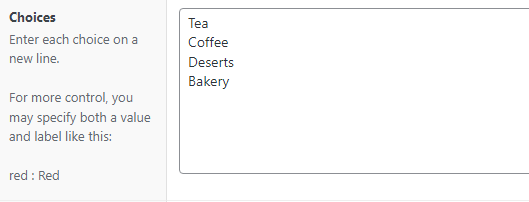
- Allow Custom: In order to allow visitors to add custom values, you can turn this option on.
- Default Value: To set a default value for any custom field, choose this option and set a value.
- Layout: For options, you can select between two types of Layouts – Vertical and Horizontal.
- Conditional Logic: You can also add conditional logic for each field just like field groups.

- Wrapper Attributes: For the Prepend and Append text, you can adjust this option to specify how the text should behave while being submitted. You can also insert Prepend, Append, and Placeholders Text in the input section, also set limits for them. But since this field is a Choice type, these options are not available here.
Once you have set this information right, we will create our next custom field.
5. For Variety of Fashion: We will set this range and set a minimum to maximum value for this.

6. Similarly, we will create another custom field for the Parking Lot and set the field type to “Number.”
Now let’s see what we have:

We have three custom fields with types: Checkbox, Range, and Number. These are the fields set from the author’s end. Now, let’s see what we Space Owners have to set.
7. When you have set all the fields, click “Publish.”
Setting Up Custom Fields (From Space Owners End)
Let’s check on how these custom fields are working on Spaces. As our site is a directory for fashion and clothing – Boho.
1. Go to Boho. Select Settings from the header. A list of options will appear before you. Select “Additional Information.”
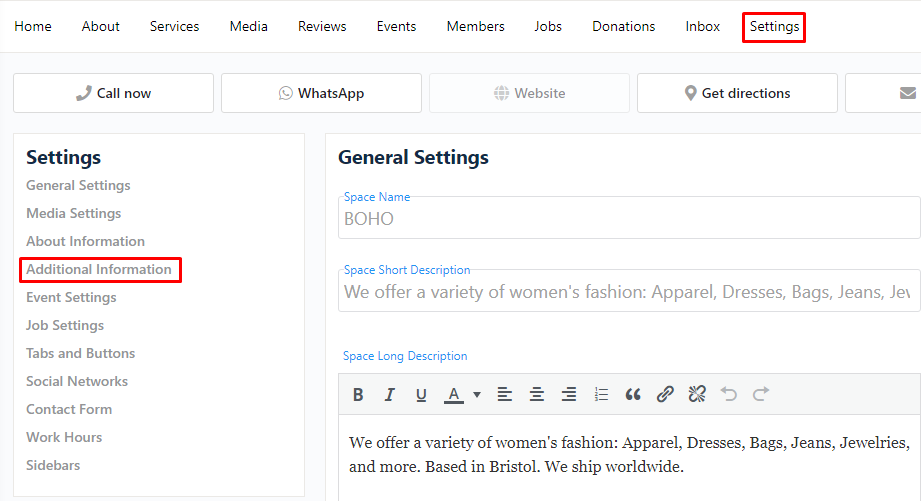
2. Here, you will have all options available for the Custom Fields. These options are set by the authors. You can adjust them and make them visible to your directory visitors.
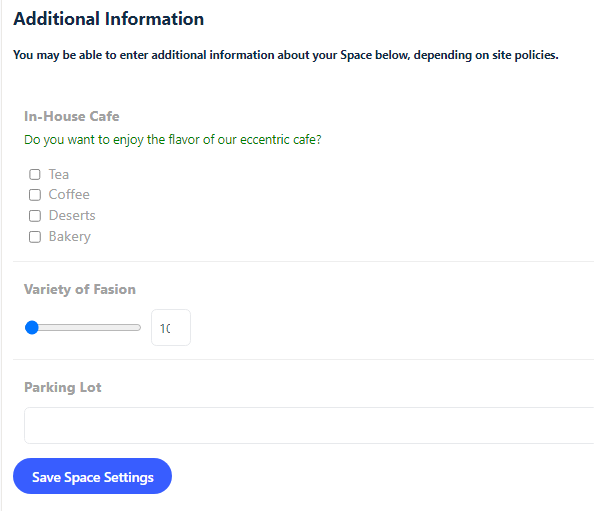
3. When you are done with all the settings, click “Save Space Settings.”
Now, log out from your Space settings. And log in with a subscription ID (if any). Go to About, and you will find all the custom field information from here.
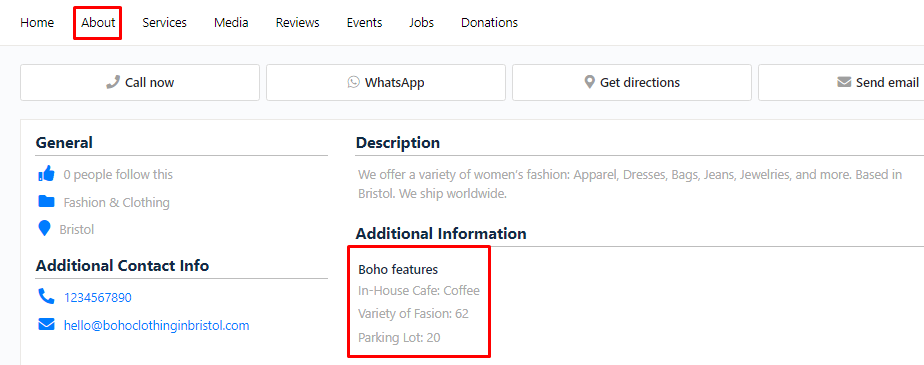
With these simple steps, you can add custom fields to your Space. To learn more about custom fields with Spaces, reach out to us here. Our support team is always ready to help you.
Final Words:
Custom fields are important for Spaces. Because as a business directory, you may need different information and they may not be available by the default information settings. This is why using custom fields with Spaces will deliver a transparent and professional directory for your audience.
The Spaces team has ensured that inserting custom fields gets easier for every user and is working relentlessly to introduce more useful features like this.
